Replacing SwiftUI Context Menu with AppKit Bridge
SwiftUI’s .contextMenu() is convenient until you need row-level presentation state. In a macOS sidebar built with LazyVStack, that limitation becomes visible when you want the row under the pointer to show a temporary colored outline while its context menu is open. The menu appears, the action works, but the row itself does not get a clean “right-click focus” state you can reliably style.
That was the motivation behind the Requesto sidebar migration: the app moved from a flat item List using SwiftUI context menus to a custom collection/item hierarchy rendered in a ScrollView plus LazyVStack. The sidebar now supports collections, item rows, inline renaming, drag-and-drop, and context-menu actions such as rename and delete.
The key change was replacing .contextMenu() with a small AppKit bridge: an NSViewRepresentable that hosts SwiftUI content inside an NSHostingView, overrides menu(for:), and reports menu presentation state back into SwiftUI.
Why .contextMenu() was not enough
SwiftUI’s .contextMenu() is declarative and compact:
row
    .contextMenu {
        Button("Delete") {
            viewModel.deleteItem(item)
        }
    }
That works well for simple menus. The problem appears when the row needs to visually react while the menu is open. In this sidebar, right-clicking either a selected or unselected collection/item should draw a colored outline around that exact row. This gives users a strong spatial cue: “the menu I am seeing belongs to this item.”
With .contextMenu(), SwiftUI does not provide a straightforward, row-local “menu is currently presented” binding. You can handle the menu action, but you cannot reliably set state when the menu opens and reset it when the menu closes. This matters in a LazyVStack, where each row is a custom view and the visual state is controlled manually rather than inherited from List.
The AppKit bridge solves that by using NSMenuDelegate.menuDidClose(_:) and a custom menu factory. The row can now say: when the menu opens, mark this collection or item as context-highlighted; when the menu closes, clear that highlight.
The target architecture
The migration introduces three main pieces:
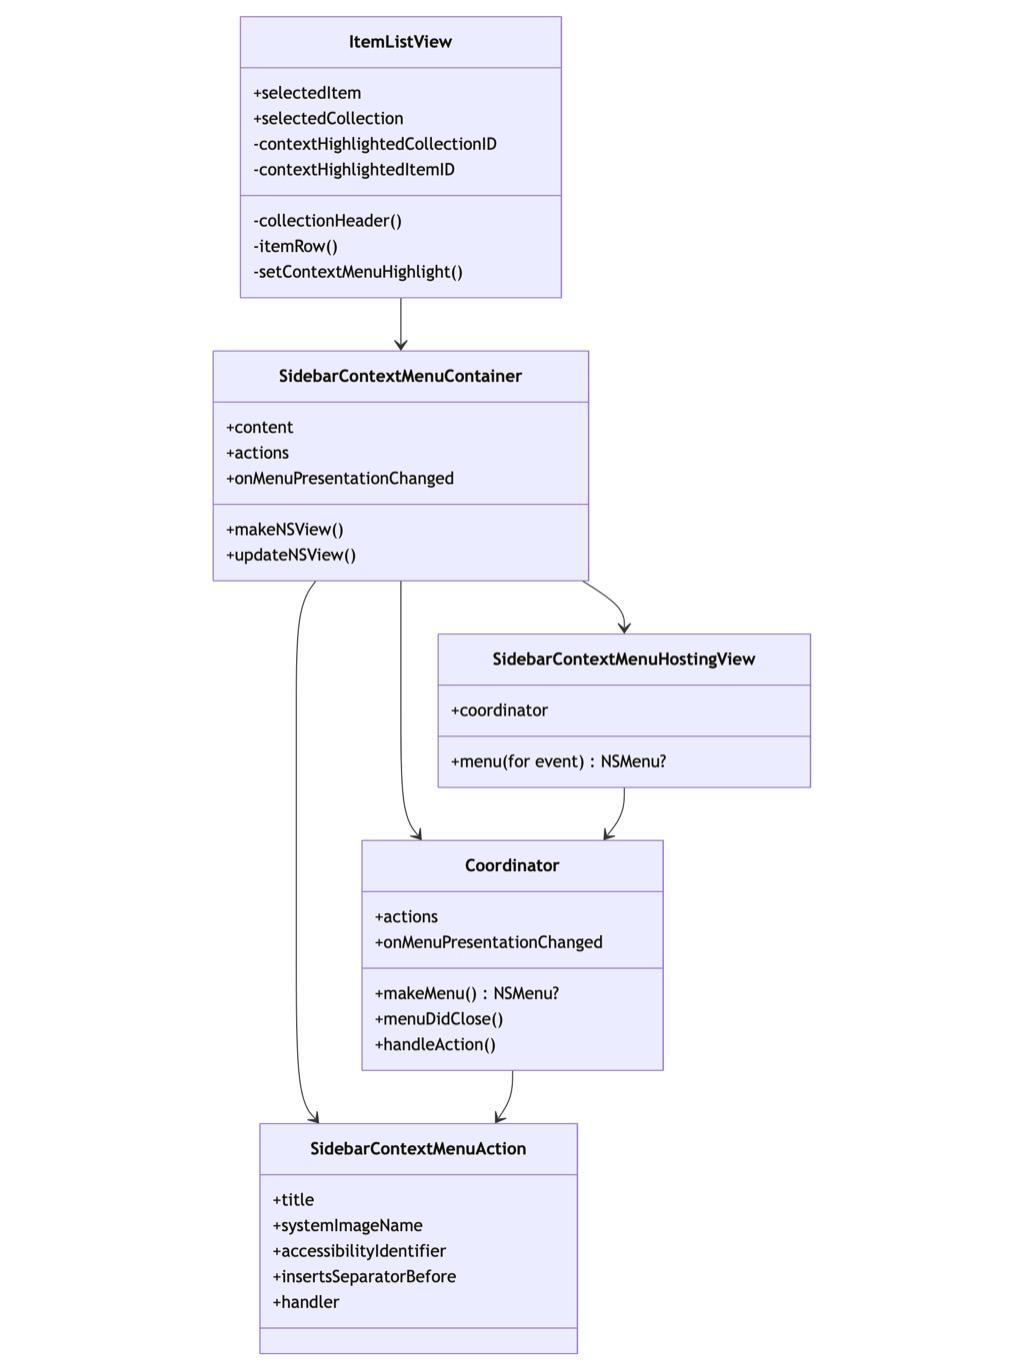
ItemListView owns the SwiftUI state. SidebarContextMenuContainer is the bridge. SidebarContextMenuAction is a plain value describing a menu item. Coordinator builds the NSMenu, assigns item targets, installs images, sets accessibility identifiers, and notifies SwiftUI when the menu opens or closes.
That separation is important. The bridge does not know what a collection or item is. It only knows that it has actions and a presentation callback. The sidebar decides what the callback means.
Building the bridge
The container is generic over SwiftUI content:
private struct SidebarContextMenuContainer<Content: View>: NSViewRepresentable {
    let content: Content
    let actions: [SidebarContextMenuAction]
    let onMenuPresentationChanged: (Bool) -> Void
}
In makeNSView(), it creates a custom NSHostingView subclass. In updateNSView(), it refreshes the root SwiftUI view and coordinator state. This is important in a LazyVStack: rows are reused, state changes frequently, and the menu needs the latest handlers.
The hosting view override is the key AppKit hook:
override func menu(for event: NSEvent) -> NSMenu? {
    coordinator?.makeMenu()
}
When AppKit asks the view for a menu, the coordinator builds one from the current action list. It also calls:
onMenuPresentationChanged(true)
The coordinator then resets the state through menuDidClose(_:):
func menuDidClose(_ menu: NSMenu) {
    onMenuPresentationChanged(false)
}
That one delegate method is what .contextMenu() does not expose directly. It gives SwiftUI a dependable close event, even if the user dismisses the menu without choosing an item.
Applying row highlights
The sidebar keeps two optional IDs:
@State private var contextHighlightedCollectionID: ItemCollection.ID?
@State private var contextHighlightedItemID: Item.ID?
The helper method sets or clears them:
private func setContextMenuHighlight(
    collectionID: ItemCollection.ID? = nil,
    itemID: Item.ID? = nil,
    isPresented: Bool
) {
    if isPresented {
        contextHighlightedCollectionID = collectionID
        contextHighlightedItemID = itemID
        return
    }

    if contextHighlightedCollectionID == collectionID {
        contextHighlightedCollectionID = nil
    }

    if contextHighlightedItemID == itemID {
        contextHighlightedItemID = nil
    }
}
Each row uses that state to drive a shared background view:
private struct SidebarRowBackground: View {
    let fillColor: Color
    let isContextHighlighted: Bool

    var body: some View {
        RoundedRectangle(cornerRadius: 6)
            .fill(fillColor)
            .overlay {
                if isContextHighlighted {
                    RoundedRectangle(cornerRadius: 6)
                        .strokeBorder(Color.accentColor, lineWidth: 2)
                }
            }
    }
}
This is the visible payoff. Selection and right-click focus are now separate. A selected row can keep its accent-colored fill, while an unselected row can still show the temporary outline when its menu is open.
Collection and item menus
Collections and items use the same bridge, but provide different actions.
A collection row defines rename and delete actions. Rename selects the collection and enters inline edit mode. Delete opens a confirmation alert. The delete item inserts a separator before itself, giving the menu the expected macOS grouping.
An item row also defines rename and delete actions. Rename selects the item and starts editing. Delete immediately calls the view model and records interaction.
The menu action model keeps this concise:
private struct SidebarContextMenuAction {
    let title: String
    let systemImageName: String?
    let accessibilityIdentifier: String?
    let insertsSeparatorBefore: Bool
    let handler: () -> Void
}
Because the bridge builds NSMenuItem directly, it can attach SF Symbol images through NSImage(systemSymbolName:), set template rendering, assign identifiers, and preserve UI-test hooks. That is useful for macOS apps where context menus must be both polished and testable.
Sequence of a right-click
The runtime flow is simple:
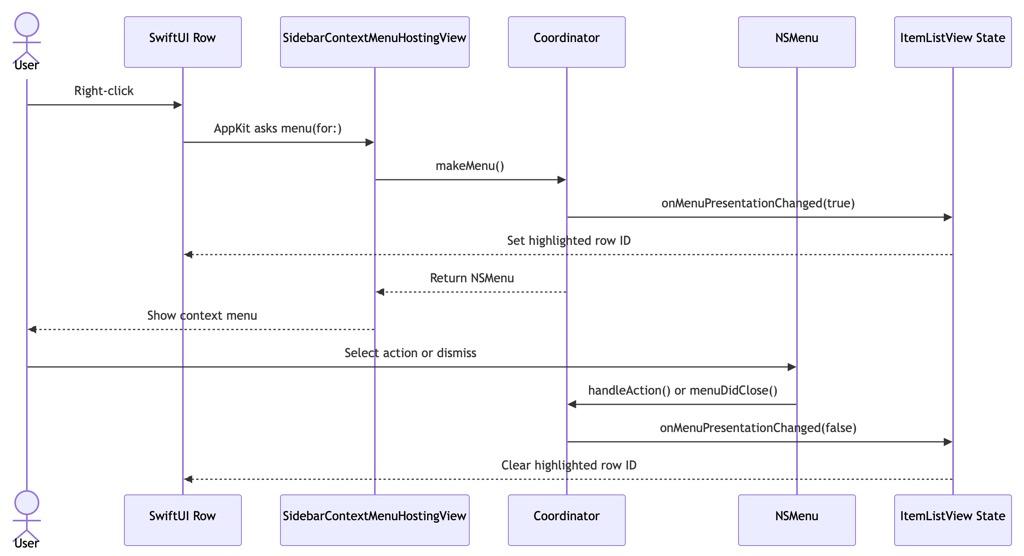
The important detail is that opening and closing the menu are both modeled. The row highlight does not depend on the action firing. It disappears correctly when the user presses Escape, clicks elsewhere, or chooses a menu item.
Flow of row rendering
The full sidebar rendering path looks like this:
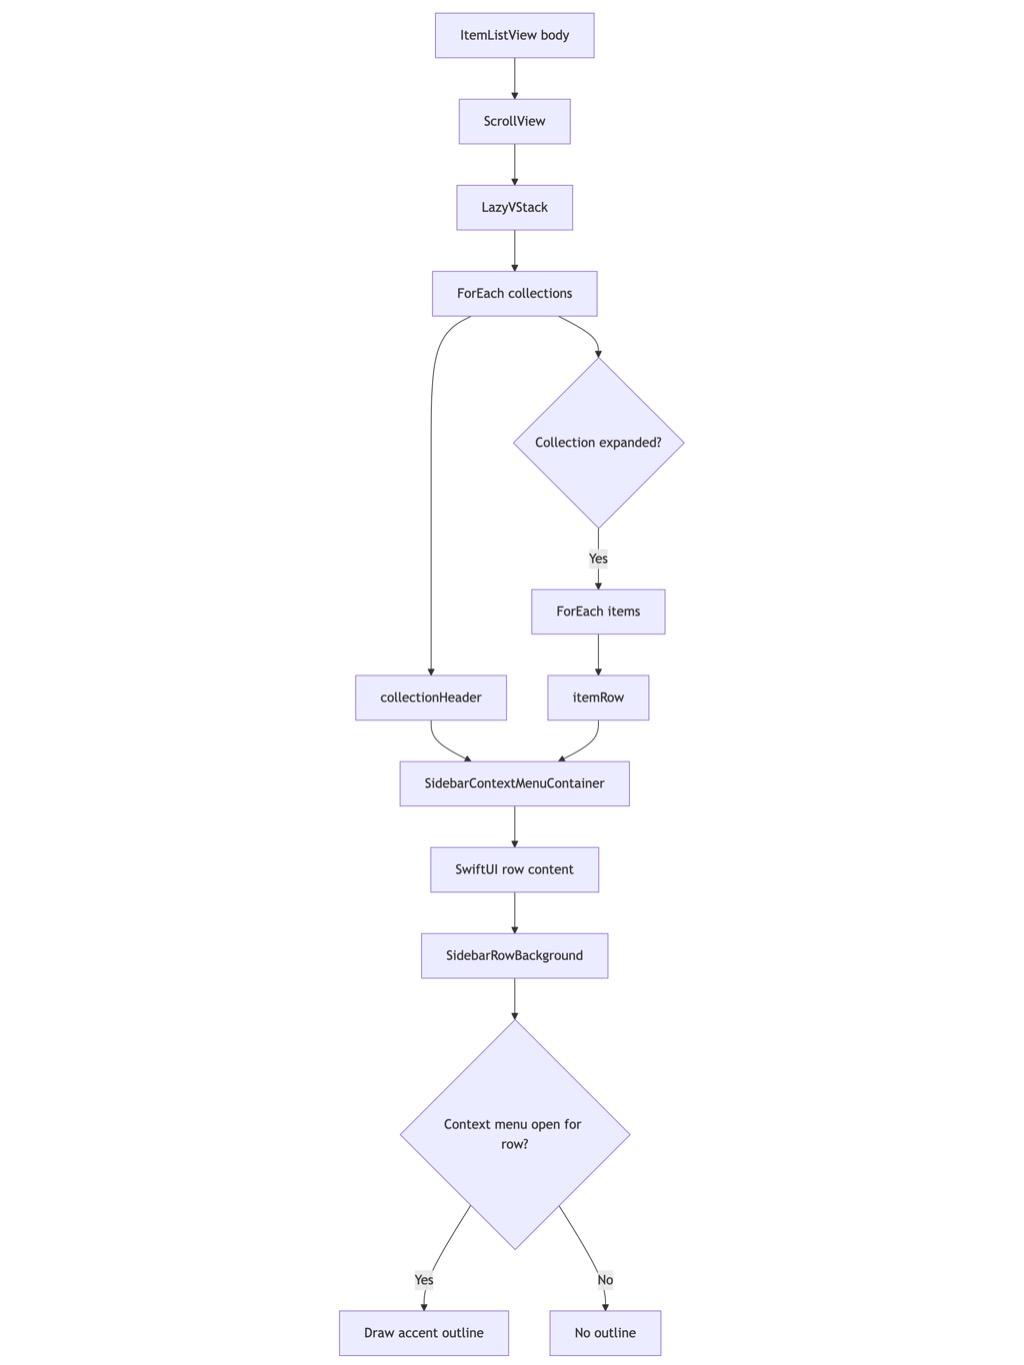
This structure also makes the sidebar more flexible than the original List. The view can mix collection headers, item rows, drag indicators, inline editing, custom row backgrounds, and drop targets inside one predictable layout.
Benefits of the AppKit bridge
The first benefit is visual correctness. Right-clicking a row produces an immediate, scoped outline. The user can tell exactly which item the menu belongs to, even when the row was not selected beforehand.
The second benefit is state control. Menu presentation becomes explicit SwiftUI state, not an implementation detail hidden inside .contextMenu().
The third benefit is better macOS integration. NSMenuItem supports separators, images, identifiers, targets, and delegate callbacks in a mature way. SwiftUI still owns the row layout, but AppKit handles the menu lifecycle.
The fourth benefit is testability. The AppKit bridge preserves accessibility identifiers such as delete-collection-menu-item and delete-item-button, making UI automation easier to target.
Tradeoffs
This approach is more code than .contextMenu(). It adds a representable, coordinator, hosting view subclass, and menu action model. It also introduces AppKit concepts into a SwiftUI view.
That cost is justified when the menu lifecycle affects rendering. For basic menus, .contextMenu() remains the better default. But for custom sidebars, source lists, outline-like hierarchies, and LazyVStack rows with selection-independent highlights, the bridge gives you the missing control without abandoning SwiftUI.
Final takeaway
Use .contextMenu() when the menu is just a menu. Use an AppKit bridge when the menu is part of the row’s visual state.
In Requesto’s sidebar, moving to SidebarContextMenuContainer made right-click highlighting deterministic, allowed selected and unselected rows to share the same outline behavior, improved menu polish with icons and separators, and kept the row layout fully SwiftUI. It is a pragmatic hybrid: SwiftUI for composition, AppKit for the context-menu lifecycle.